I enjoy exploring recipes that use different grains, as they are a healthy alternative to pasta.
This recipe is wonderful. I found it on Epicurious, however I changed some of the ingredients to make it more to my liking. It was simple and delicious. Of course I added lemon zest, which really brought out a delightful new zing. The toasted barley completed the new dimension of flavor I was hoping to achieve.
Add this barley recipe to your weeknight dinner menu. You won’t be sorry. It will pair well with any main course, and it will be a family and crowd pleaser. It is a hardy and nutritious side dish that you will be making over and over.
This recipe will serve 4-6 very happy new barley lovers!
Ingredients for Barley Pilaf
2 tbsp. margarine or butter
1 small onion, finely chopped
3/4 cup toasted barley (Manischewitz)
2 cups chicken broth
1 carrot, peeled and finely chopped
1/2 red pepper, finely chopped
1 bay leaf
1 tsp. lemon zest
1 tsp. fresh lemon juice
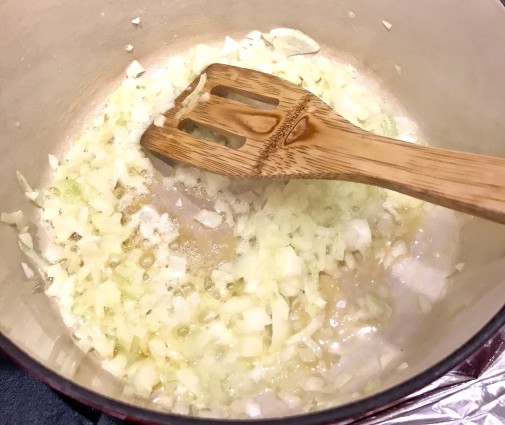
Melt the butter in a dutch oven or heavy bottomed saucepan over low heat.
Turn the heat up to medium and add the onions and carrots.
Sauté until onion is softened and translucent about 4-5 minutes.
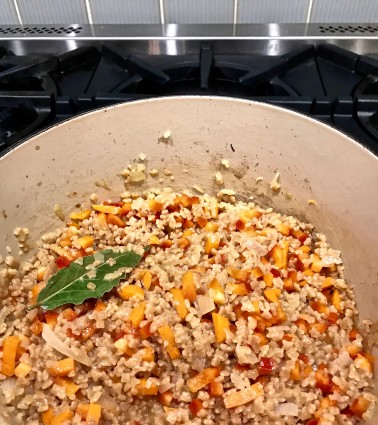
Add the chicken broth and bay leaf and bring it to a boil.
Add the barley, reduce heat to low and stir.
Cover and cook until barley is soft, about 10 minutes.
Add carrot, red pepper, lemon juice and zest, cover and cook until vegetables are softened, about 8-10 minutes.
Remove the pan from the heat and let it stand, covered for about 10 minutes.
Discard bay leaf, season to taste with salt and pepper.
This recipe is a very simple option for any weeknight meal. The prep takes very little time and the outcome is perfect for warming up any winter day.
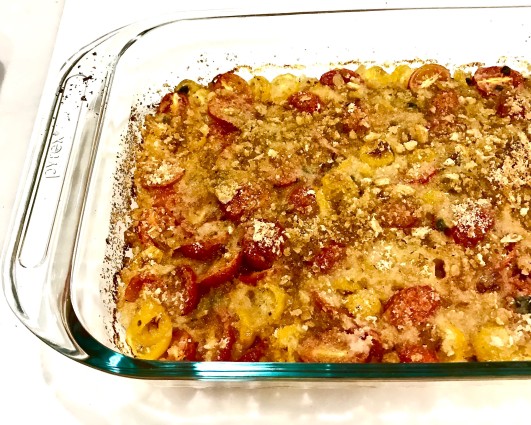
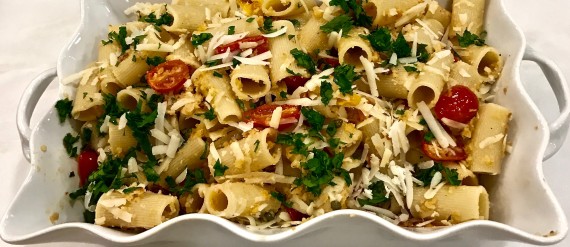
The sweetness of the roasted tomatoes, combined with the capers and breadcrumbs, definitely makes this dish a “must try”. The breadcrumbs are perfectly browned and give this dish a delightful texture. The presentation is beautiful, making it a wonderful option for company as well. You probably have most of the ingredients in your pantry, so this is a no-brainer!
As always, Giada DeLaurentis continues to be so dependable when creating delicious recipes. This one may just be one of my favorites. This recipe will serve 4-6 very contented, happy people.
Ingredients for Pasta Ponza
Butter for greasing 2 cups (12 ounces) red cherry or grape tomatoes, halved 2 cups (12 ounces) yellow cherry or grape tomatoes, halved 1/4 cup capers, rinsed and drained 1 tbsp. extra-virgin olive oil, plus extra for drizzling 1/2 tsp kosher salt, plus extra for seasoning 1/4 tsp. freshly ground black pepper. plus extra for seasoning 1/2 cup Italian-style seasoned breadcrumbs 1 pound ziti or other short tube-shaped pasta 1 1/4 cups pecorino-Romano cheese, grated 1/4 cup chopped fresh flat-leaf parsley
Place an oven rack in the center of the oven.
Preheat the oven to 375 degrees.
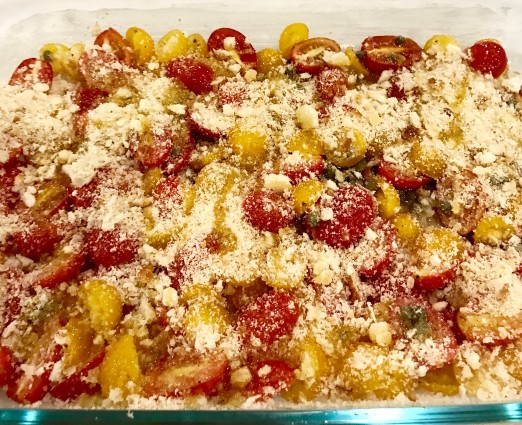
Butter an 8 by 8-inch glass baking dish. Set aside.
Place the tomatoes, capers, 1 tbsp. olive oil, 1/2 tsp kosher salt, and 1/4 tsp. pepper in the prepared baking dish. Toss to coat.
Sprinkle the breadcrumbs over the tomato mixture.
Drizzle the top with olive oil and bake for 30-35 minutes until the top is a golden brown.
Cool for 5 minutes.
Bring a large pot of salted water to a boil over high heat. Add the pasta and cook until tender but still firm to the bite, stirring occasionally, about 8-10 minutes.
RESERVE ONE CUP OF THE PASTA WATER.
Drain the rest of the pasta water.
Place the pasta in a large serving bowl. Spoon the tomato mixture onto the pasta.
Add the cheese and toss well.
Thin out the sauce with a little of the reserved pasta water, if needed.
I am not usually a fan of gratins, as they always seem to be heavy and have too much cheese.
This time, however, I had most of the ingredients in my refrigerator, so I thought I might give it a try. I followed the recipe, but, when it came time to put the cheese mixture in, I used less than half of it. I did use all the breadcrumbs (and maybe a bit more) than the recipe called for.
The result was this tasty gratin that was as delicious as it was satisfying. The amount of the cheese mixture was just right and the breadcrumbs were beautifully browned and crispy. The cauliflower and the broccoli were cooked to perfection. Of course if you prefer, go ahead and throw the entire cheese mixture in. I am sure that might be just as enjoyable.
You might even try adding some nutmeg or paprika. Switch the cheese to Swiss or add in some onion or garlic. Remember a recipe does not have to be followed exactly. You are always free to omit or change any of the ingredients. Whatever you do, put this one on your list to make. It is perfect for a cold winter day and is very easy to whip up.
This recipe is courtesy of Food Network and will serve 4-6 (more like 6) very satisfied gratin-lovers.
Today’s Hint:Buy a couple of different kinds of bread such as Italian, Sourdough or French. Wait a day or two, and place them in the food processor. Then pour them into one big plastic bag (freezer-ready), shake it up and freeze. Now you will have fresh breadcrumbs whenever you need them. They are so much better than the store-bought kind, and they will last a very long time in the freezer. This is an easy tip that is so worth it!
Ingredients for the Broccoli and Cauliflower Gratin
1/2 stick (4 tbsp.) unsalted butter, plus 1/2 tbsp extra for greasing the baking pan 1 head of broccoli, cut into florets 1 head of cauliflower, cut into florets 1/4 cup all purpose flour 2 cups half and half 2 cups shredded sharp with Cheddar cheese 1/2 tsp. kosher salt 1/4 tsp. pepper 1/2 cup dry breadcrumbs
Preheat oven to 450.
Grease a large baking dish with the extra butter and add the cauliflower and broccoli.
Roast until slightly browned, about 15 minutes.
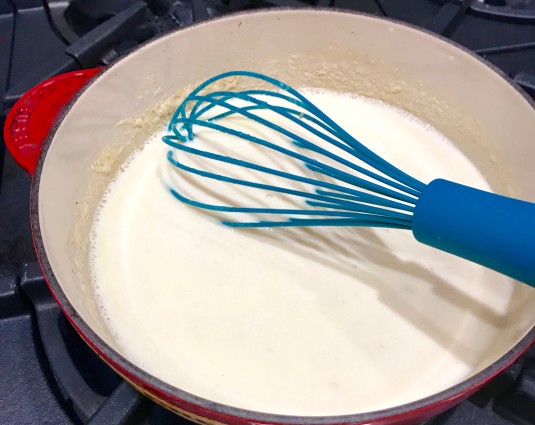
In a medium sauce pan, melt the butter.
Once butter has melted, whisk in the flour and let it cook over medium heat for 3 minutes, whisking often.
Turn the heat off and whisk in the the half and half.
Turn the heat back up to high and keep whisking to avoid the flour from clumping.
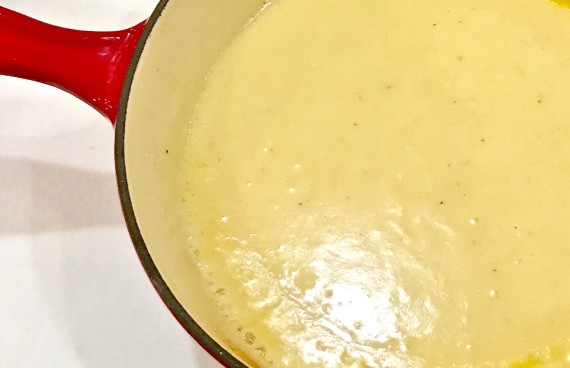
Add the cheddar, salt and pepper and whisk until the cheese is melted.
Remove the broccoli and cauliflower mixture from the oven and pour the cheddar mixture over the top.
*I only used half of the cheddar mixture for this. I did not want it swimming in cheese! Feel free to add all the cheese if you want to.
Sprinkle evenly with the breadcrumbs and place the gratin back in the oven for 25-30 minutes until golden brown.
*I used a little bit more breadcrumbs, almost 1 cup!
When you read through this recipe, it may seem like a long process, but the steps actually went quickly, and it was pretty easy to make.
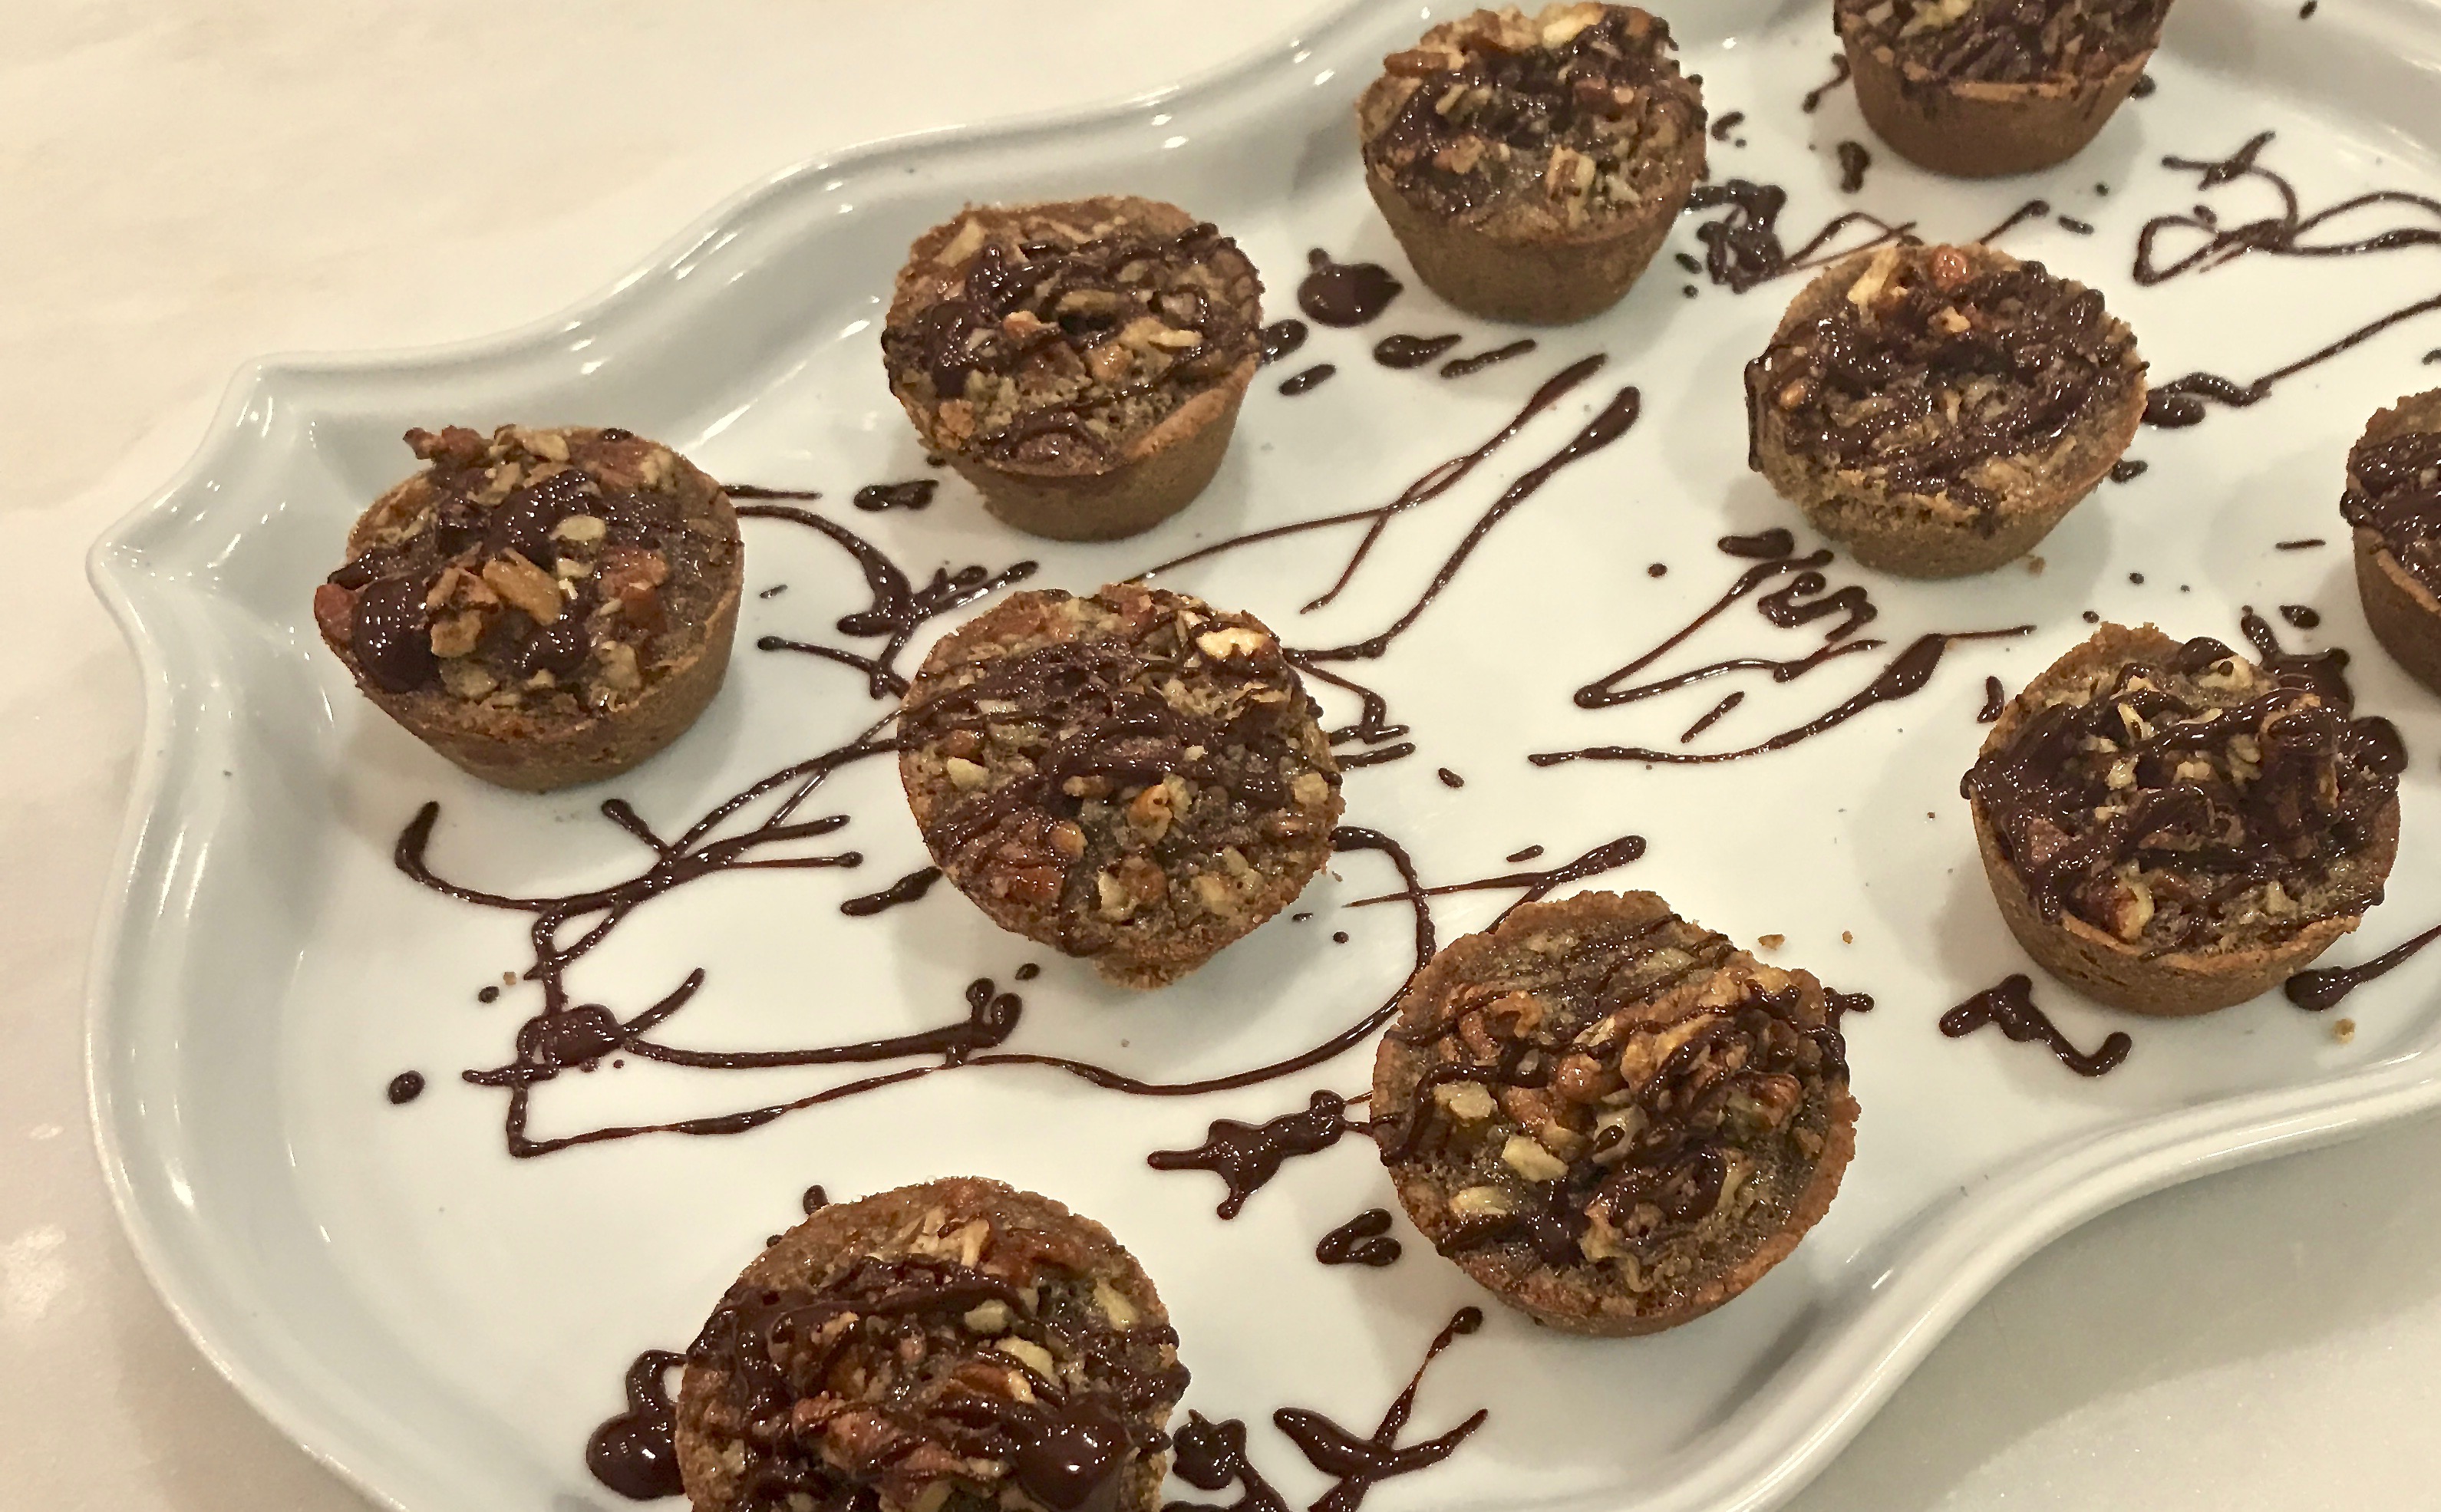
This recipe caught my eye because of the beautiful picture it had of the finished tassies. This was the first time I had heard about them and wanted to give them a try. A tassie is a small tart or miniature pie. This dessert is a miniature version of a pecan pie.
When I rewrite a recipe for this blog, there are many times I find that the instructions are confusing and unspecific. After preparing the recipe myself, I often change the directions to make them clearer and easier to follow.
One common mistake I come across, especially in dessert recipes, is when they call for toasted nuts. The author never instructs you on how to toast them. I will always include that process in my interpretation of the recipe.
This recipe is wonderful. The tassies look professionally made and taste delightful. The drizzeled chocolate adds a beautiful layer and luscious taste. You can go with the low-fat ingredients, but I did not. I will leave that up to you. Bring this beautiful dessert to a dinner. They will make you a star!
This recipe is courtesy of Cookinglight.com. It says it makes 24 tassies, but I only got 20, so you may want to double up on the crust ingredients.
Ingredients for the Bourbon-Pecan Tassies
Crust: Baking spray with flour
2 tbsp. canola oil
2 tbsp. butter, softened
1 tbsp. powered sugar
1 tbsp. 1% low-fat milk
1 oz. 1/3-less fat cream cheese, softened (I used regular cream cheese)
1/3 cup chopped toasted pecans
1 cup whole grain rye flour
1/4 tsp. kosher salt
Filling: 1/3 cup packed brown sugar
1/3 cup pure maple syrup
2 tbsp. bourbon or rye whiskey
2 large eggs
1 tbsp. butter, melted
1/4 tsp. kosher salt
2/3 cup chopped toasted pecans
1 0z. bittersweet chocolate, chopped
To prepare crust:
Preheat oven to 350.
Process 1 cup of chopped pecans into a food processor until finely ground.
Lay them out on a baking sheet and place in the oven for 10-15 minutes, until just lightly browned. Take them out and set aside. Leave the oven on 350.
Generously coat a 24 cup mini muffing pan with baking spray.
Beat oil, 2 tbsp. butter, powdered sugar, milk, and cream cheese with an electric mixer on medium speed until well combined.
Set aside.
Weigh or lightly spoon flour into a dry measuring cup; level with a knife.
Place in food processor with 1/3 cup of pecans,1/4 tsp. salt.
Pulse 5 times.
Add butter mixture to flour mixture; beat until just combined. Mixture will be crumbly.
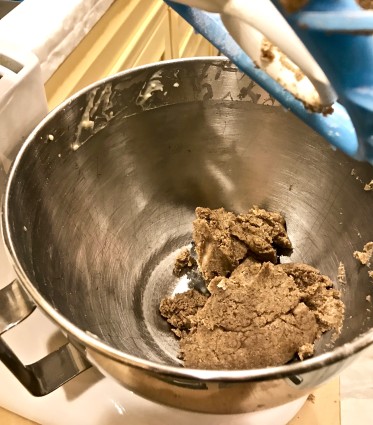
Take bowl off of food processor and knead in bowl until dough comes together, 3-4 times.
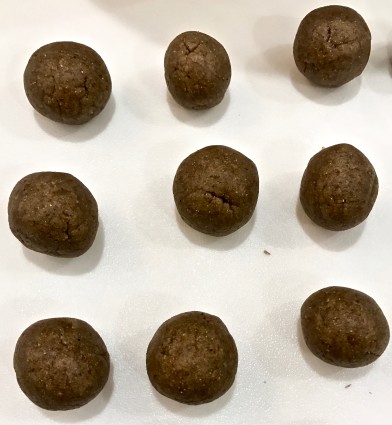
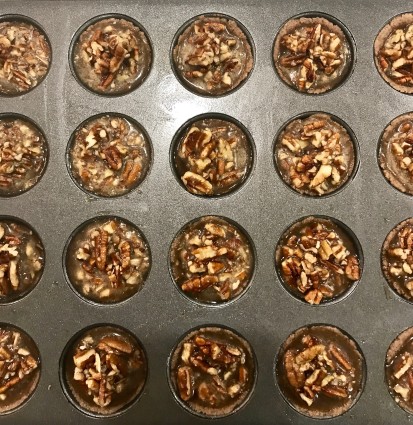
Shape dough in 24 balls. (I got 20).
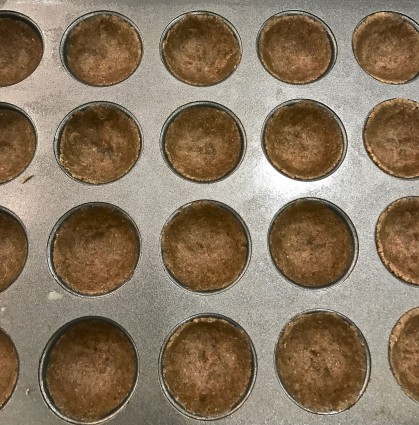
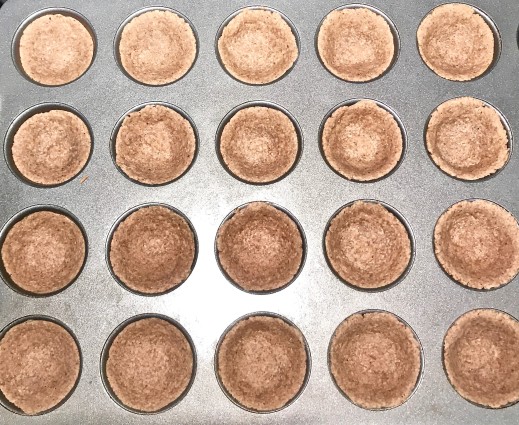
Press dough into the bottom of the prepared muffin pan, and press up the sides as well to form a shell.
Place in oven and bake for 5 minutes.
Cool for 10 minutes.
To prepare filling:
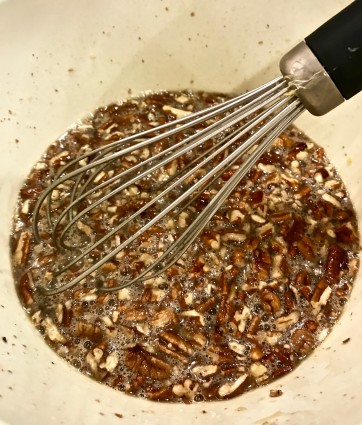
Whisk together brown sugar, maple syrup, bourbon, eggs, 1 tbsp. butter, and salt in a large bowl.
Stir in 2/3 cup pecans.
Spoon about 1 tbsp. pecan mixture into each tart shell.
Bake 18 minutes or until filling is puffed and browned.
Cool 20 minutes.
Microwave chocolate in a microwave-safe bowl on high until it melts, about 45 seconds, stirring every 15 seconds. Set aside.
Run a spatula around the edges of the tarts to loosen; remove tarts from the pan. Drizzle chocolate evenly over each tart.
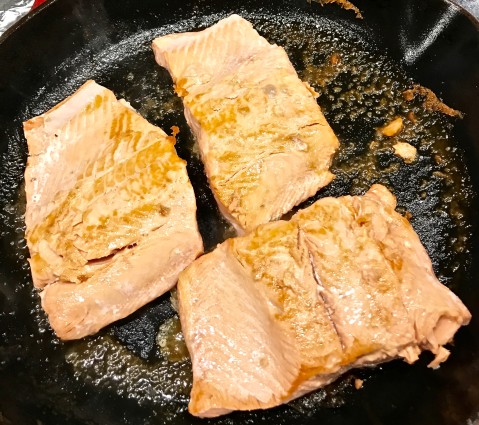
I am always looking for new ways to make salmon. It is a fish my family enjoys, so I make it fairly often.
Usually I cook the salmon in the oven because I never want to turn it over. I am always fearful that it will fall apart and not look appetizing when I plate it.
It is time for a new adventure with salmon. Besides, who cares if it falls apart a little? It will still taste wonderful.
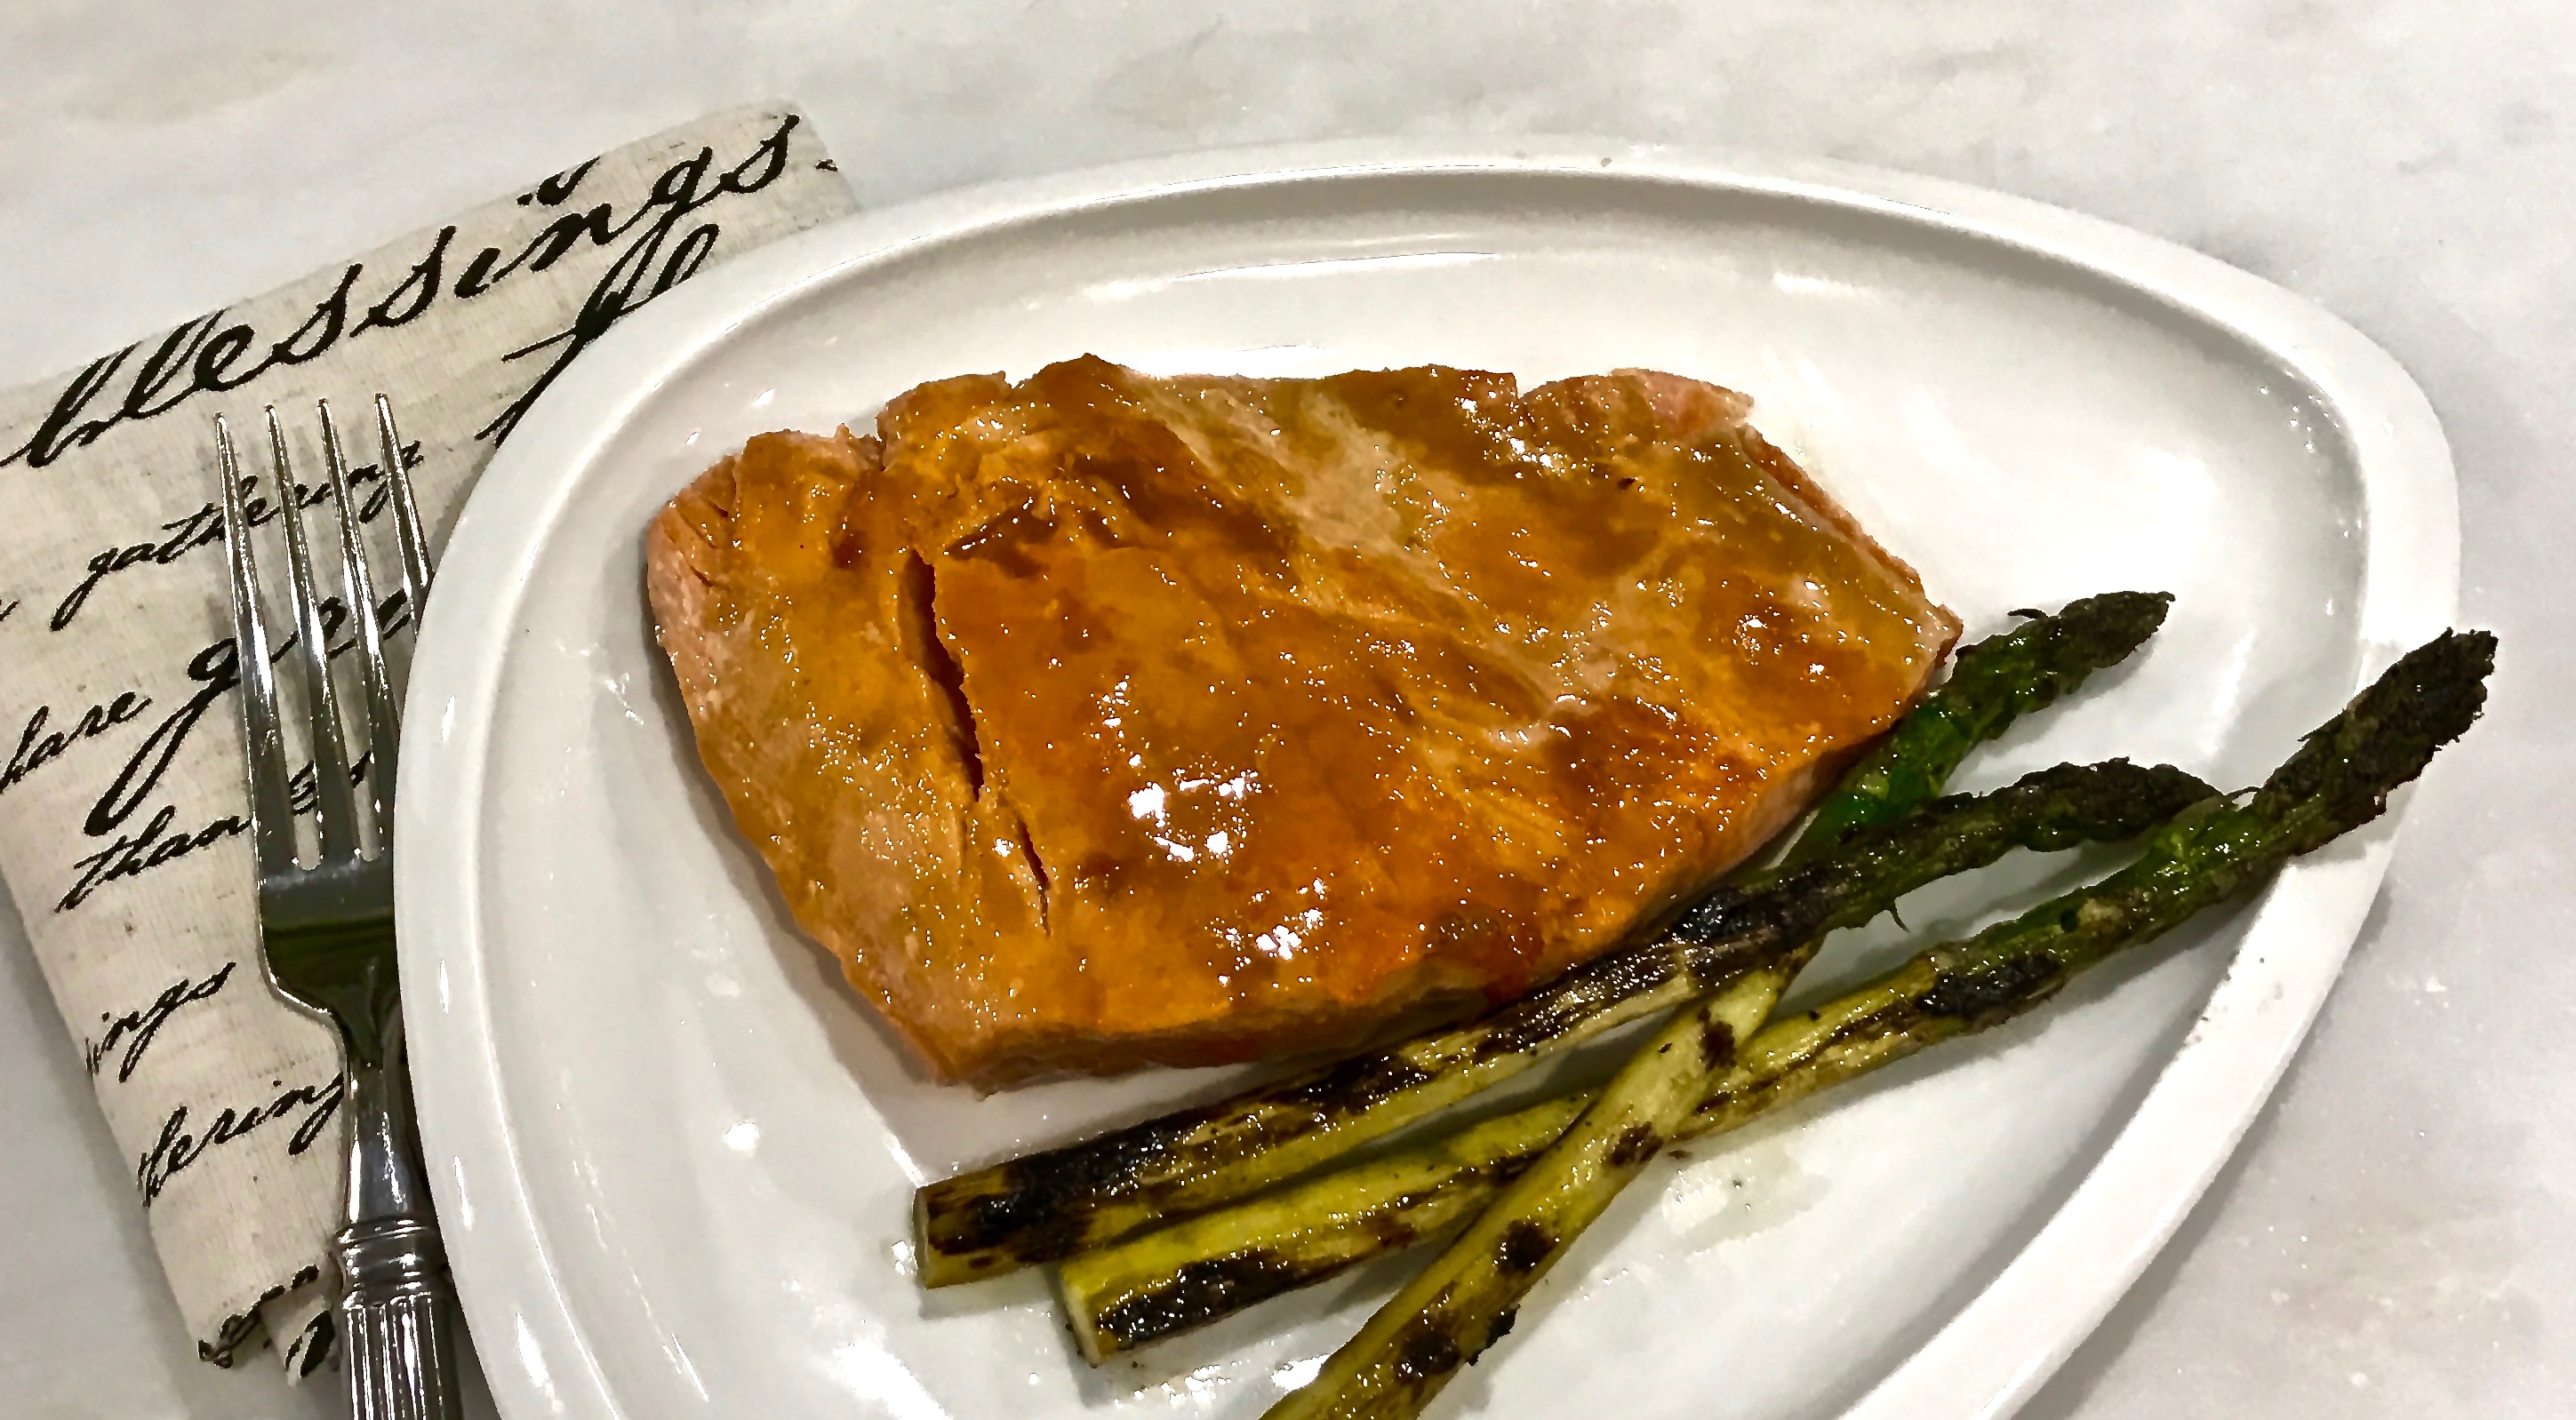
This recipe is surprisingly easy, and turning it over really gives the salmon skin a delicious new quality of flavor.
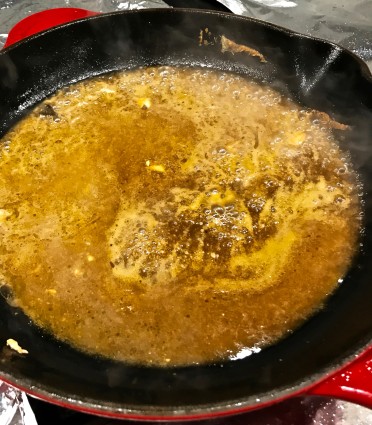
When you add the sauce, this turns out to be an amazingly fresh new way of enjoying salmon. (Of course, if you want you can bake the salmon at 350 for 25 minutes and then top it with the sauce). I like the taste of the skin cooked in the pan, especially with this dressing. It comes out moist inside with a crispy golden exterior.
This is a great, quick dinner for any day during the week. The sauce can be used with a variety of fish or chicken. Give it a try, I am sure you are going to love it!
This recipe is courtesy of Epicurious.com. It will serve 2 very happy fish enthusiasts.
Ingredients for Honey and Soy Glazed Salmon
4 tbsp. honey
4 tbsp. soy sauce
3 tbsp. freshly squeezed lime juice
4 tsp. Dijon mustard
2 tsp. water
2 tsp. vegetable oil (I used olive oil)
2 (six-ounce) pieces salmon fillet
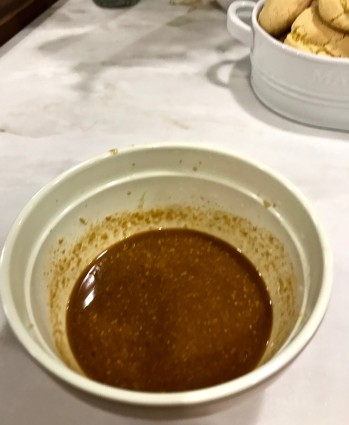
In a small bowl, whisk together the honey, soy sauce, lime juice, mustard, and water. Set aside.
In a non-stick skillet, heat oil over medium heat until it is hot but not smoking.
Place salmon fillets into skillet and cook 2-3 minutes each side, or until golden and just cooked through. (this may take you more or less time, depending how thick your fillets are).
Transfer salmon fillets to a plate. Set aside.
Add honey-soy glaze to the same pan and simmer, stirring, about 1 minute. (Remember, your pan will be very hot, so this step shouldn’t take much time at all).