This is the 6th year anniversary of my blog! I simply cannot believe it! It has gone so fast and I have loved every minute I put into it. I want to thank you all for following me, even when I had to take a break when I remodeled my kitchen.  I see all those familiar names on Facebook, and I’ve loved getting to know you through online interactions. I am so grateful to everyone who comes to read and share my passion for cooking.

I love to read recipes and cookbooks. Antiquated, I know but I get a rush out of seeing the covers, turning the glossy pages, and looking at the beautiful pictures that accompany them. Most people get their recipes off the internet nowadays, and I do that as well, but I know I will never stop buying cookbooks. 

When I get a new cookbook, I read it through completely and mark the recipes I would like to try. I copy the recipe I am going to use so there is no chance I get my cookbooks dirty while I am making it. Before I did that, my cookbook pages, especially the ones I used repeatedly, became worn, dirty, yellow. But, not anymore! They stay clean and crisp and always feel brand new.

When I find a recipe I would like to use, I search the internet for similar recipes. Then I write down all the ingredients I would like to add and make it my own. It takes time and effort, but I enjoy doing this and feel especially accomplished when my recipe turns out to be, as we call it in my home, “blog-worthy”. Sometimes it takes more than one attempt, and I have certainly made countless recipes that have ended up in the garbage.

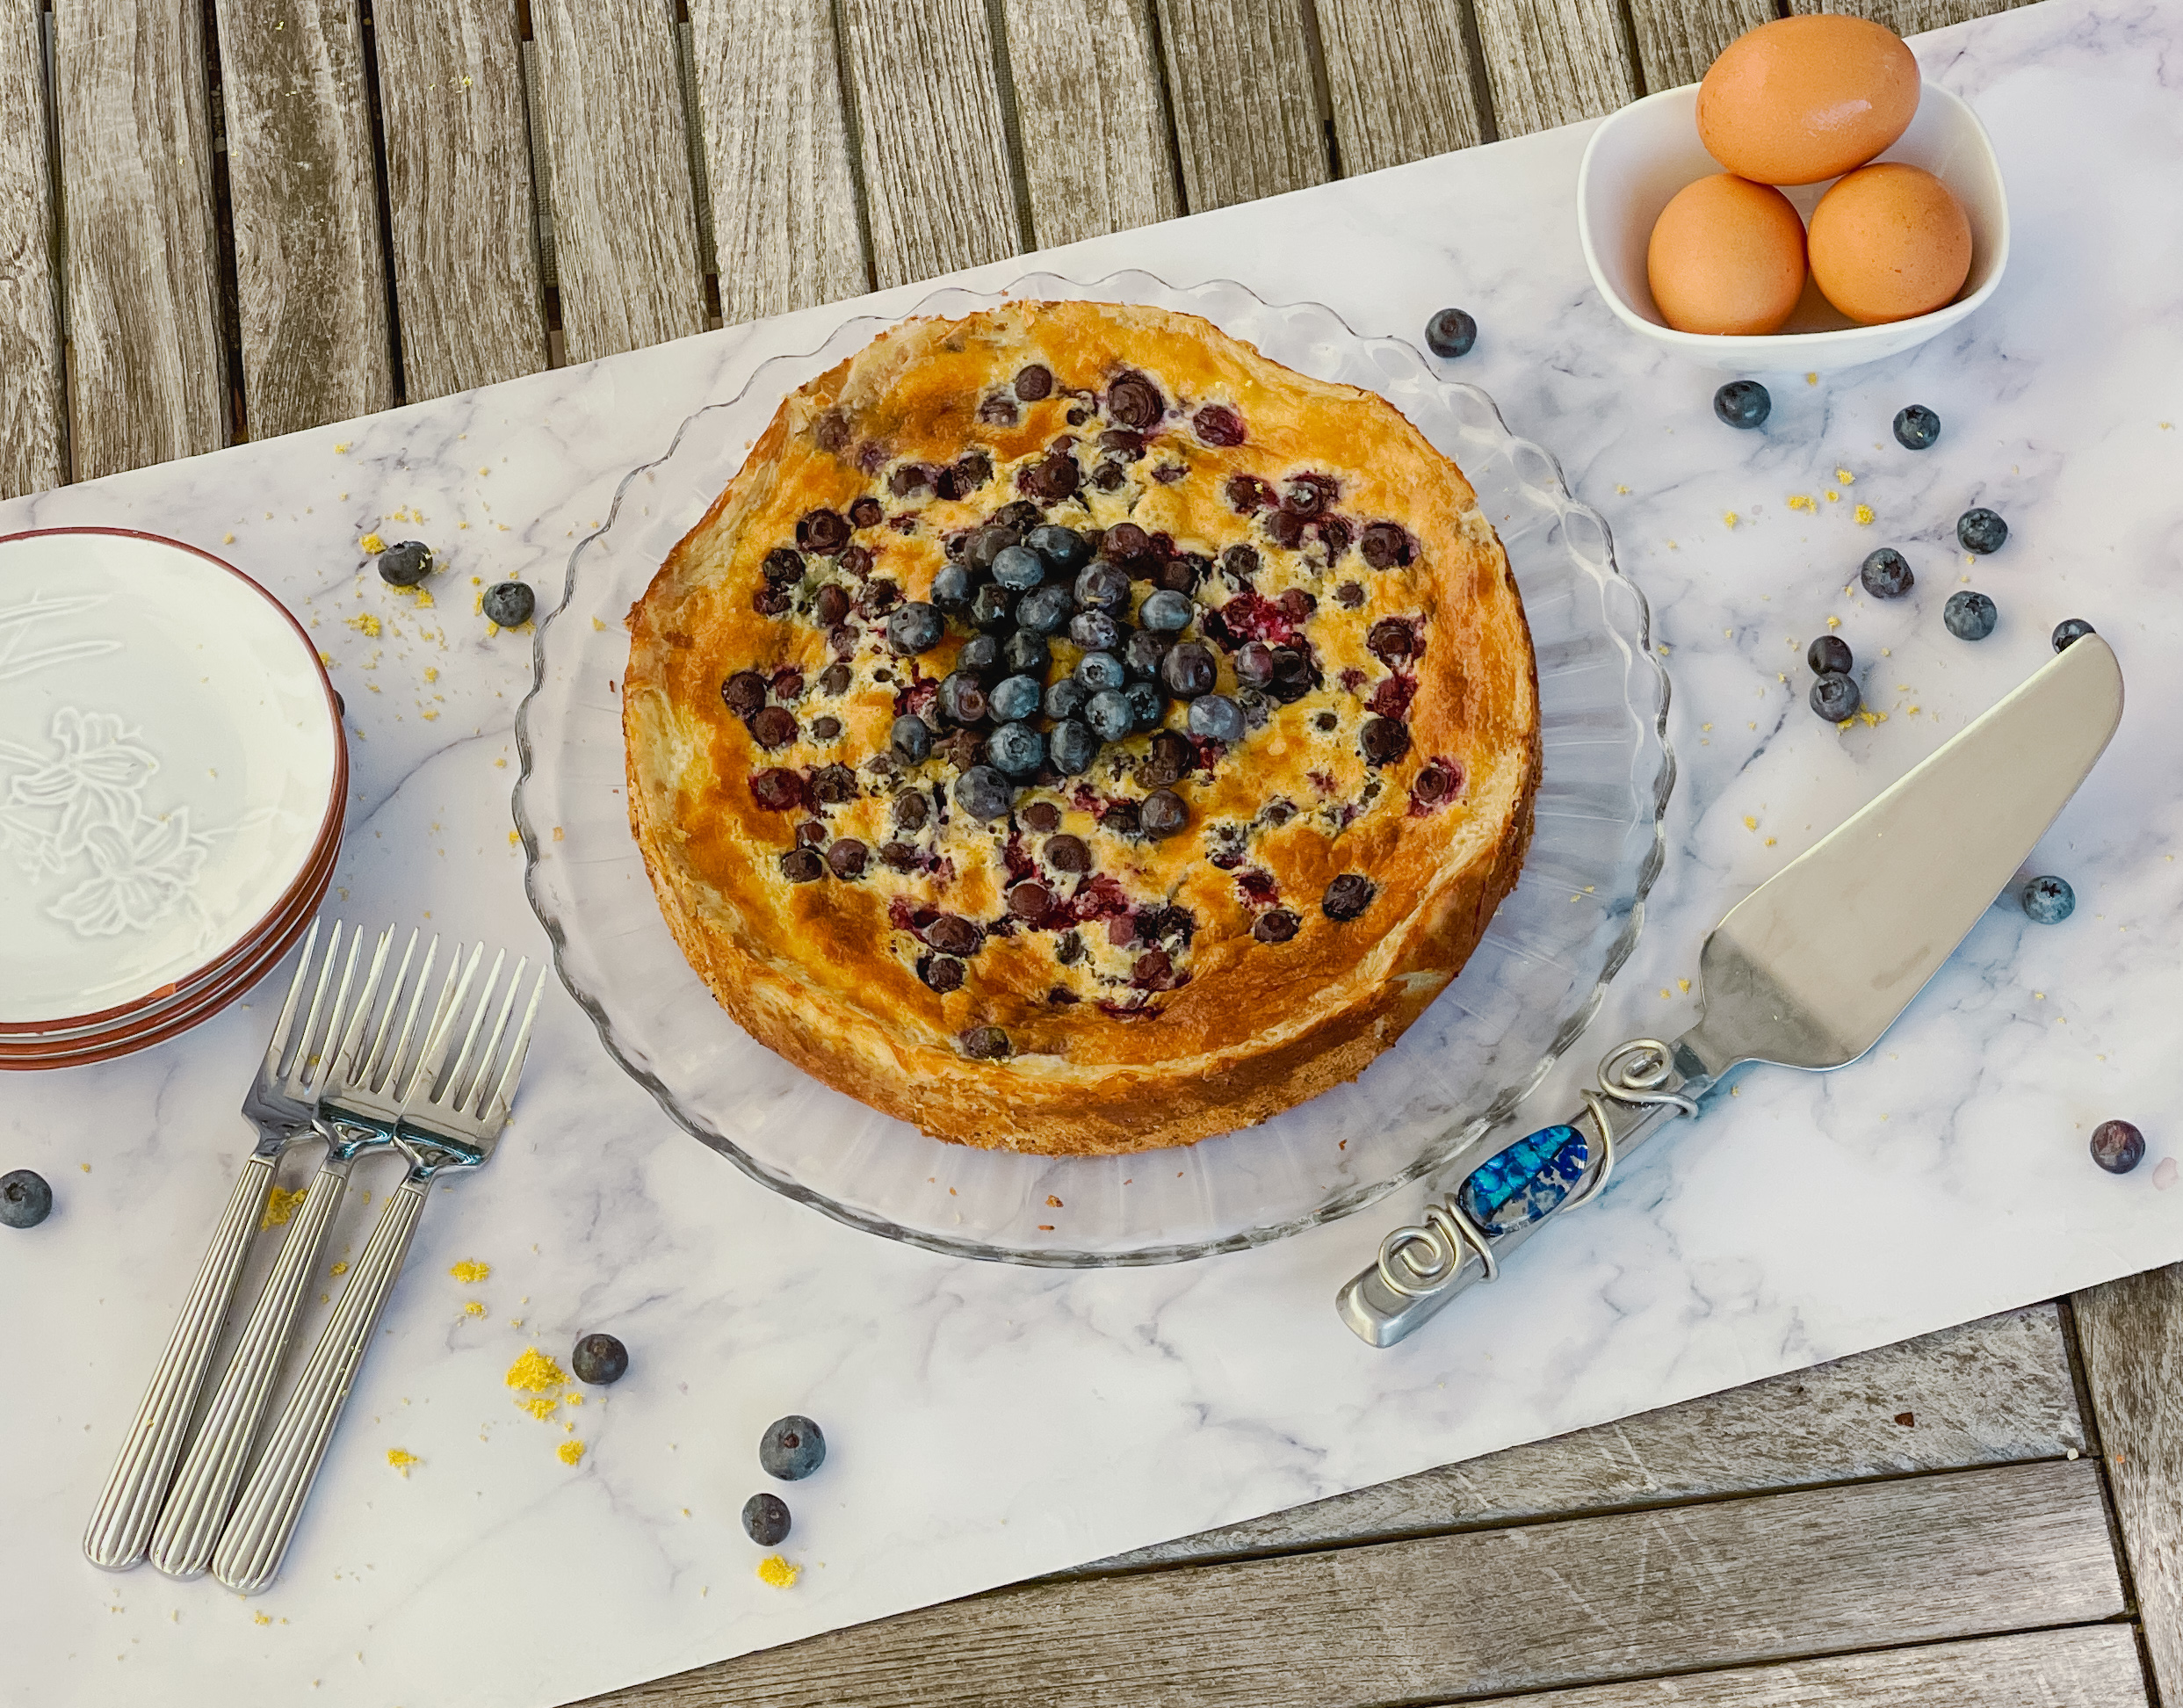
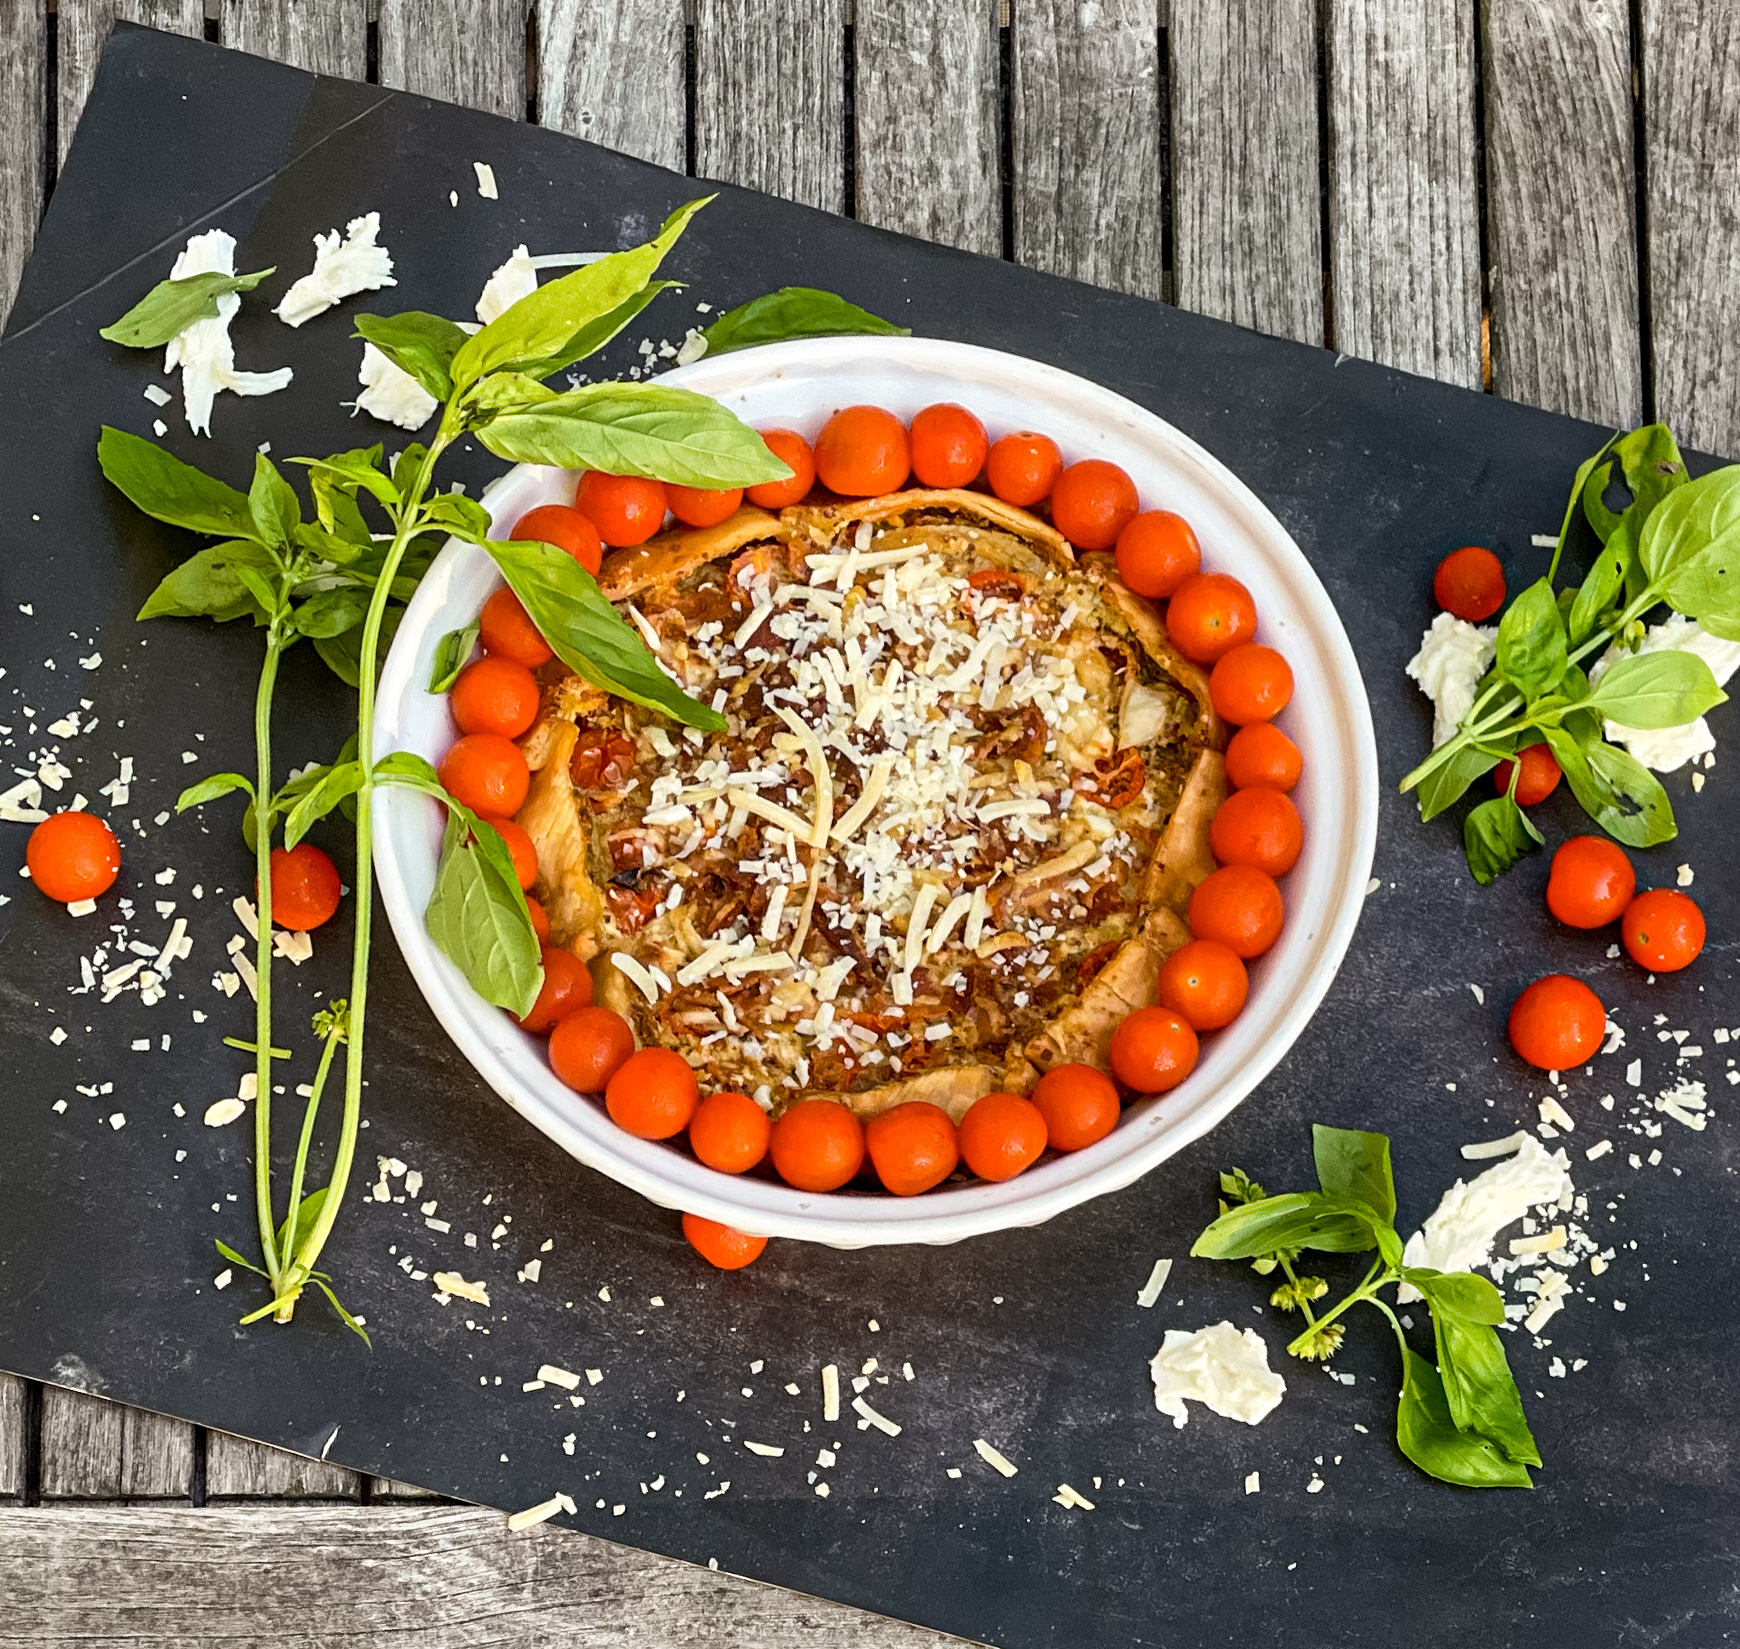
This dish is one of my successful creations.  Perfect for any summer meal, this is a winner. The tomatoes are combined with delicious onions, and mozzarella and basil provide a perfect accompaniment. The bacon and Parmesan cheese make this pie perfection. It is housed in a moist, delicate pie crust that is yummy goodness in every bite. Don’t miss this one, your family is going to love it. It is also a wonderful and beautiful dish to serve to company, and so easy to prepare!

This recipe is truly Simple By Cindy, and makes 6 to 8 servings of a surprising and delicious savory treat.

Ingredients for Rustic Tomato Pie:

Frozen pie dough for single-crust pie
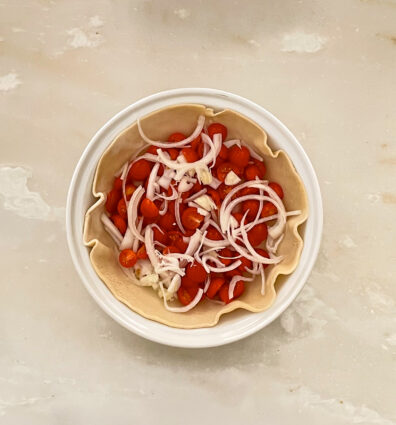
1 pound mixed tomatoes, seeded and cut into 1/2-inch slices
1/2 pound cherry or grape tomatoes, cut in half
1/4 cup thinly sliced yellow onions
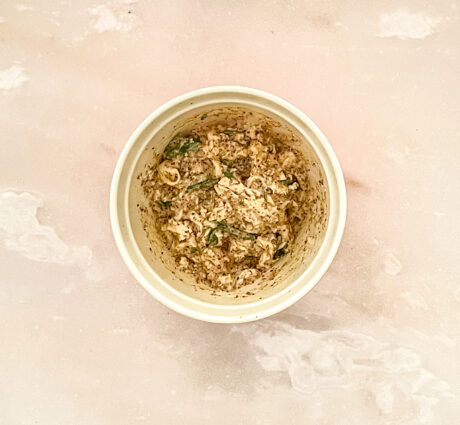
1/4 cup mayonnaise
4 tablespoons stoned ground mustard
1/2 cup shredded mozzarella  cheese
2 tablespoons fresh basil, chopped
1 teaspoon salt
1/2 teaspoon pepper
2 bacon strips, cooked and crumbled
1/2 cup grated Parmesan cheese

Preheat oven to 400°. 

On a lightly floured surface, roll dough to a 1/8-in.-thick circle; transfer to a 9-in. pie plate. 

Trim crust to 1/2 in. beyond rim of plate. 

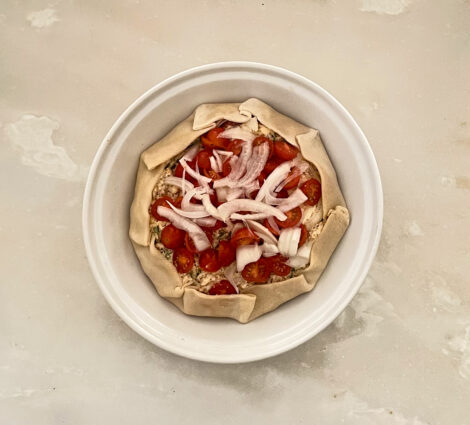
Place half of the tomatoes and half of the onions in crust.

Combine mayonnaise, mustard, mozzarella, basil, salt and pepper.

Spread over tomatoes.

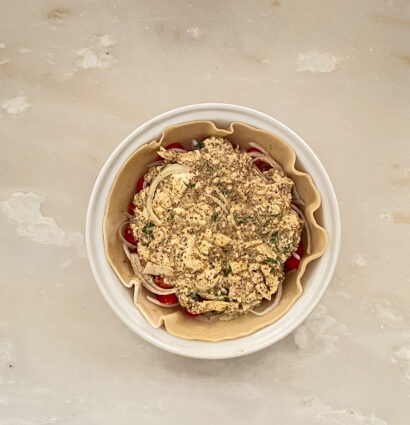
Top with remaining onions and tomatoes.

Fold crust edge over filling, pleating as you go and leaving an 8-in. opening in the center.

Sprinkle with bacon and Parmesan cheese.

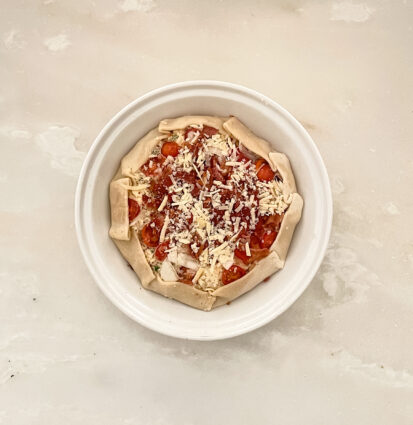
Bake on a lower oven rack until until crust is golden and filling is bubbly, 30-35 minutes.

Let stand 10 minutes before cutting.

If desired, sprinkle with additional basil.

It’s that simple!


signature

[recaptcha]


As you might expect, most people do not enjoy summer cooking. When the weather gets too hot, standing in front of a stove or grill is an awful chore. But, summer or  winter, we still have to eat. During the summer, we often turn to lighter dishes and eating outside on the patio. For some, it has become a nice ritual that we can use to connect to the environment and the seasons.

As the weather warms up, we find ourselves craving summer recipes–the kind that lets you use local produce without spending much time over a hot stove. The summer produce is absolutely worth waiting for. Summer squash, corn, cucumbers, and tomatoes make mouthwatering meals in no time at all.

When the weather is warm, you want to be outside at a pool or the beach, not slaving over a stove that can make you cranky, hot and tired. The beauty of fresh produce is that you can make quick, simple, and delicious dishes. Some of the produce is so insanely good on its own, you don’t have to do much of anything to let the flavors shine. Trust me, just because these dinners are quick and easy doesn’t mean they’re short on flavor. Just take some of your freshest vegetables and mix them with some kosher salt, pepper, oil, and even some lemon zest and juice, and dinner is done. Yes, it can be that quick, which leaves plenty of “me” time to enjoy the long days and beautiful nights. 

We tend to eat less too, unless we are at a bountiful barbecue where the smell of the food cooking makes us even hungrier. If you find yourself too full, try to have a small salad to fill you up, and drink lots of water, which makes you feel full and hydrates you at the same time. Try not to overindulge on cookies, ice cream, or junk food too, though don’t feel guilty for indulging in a treat every now and again.

This is a crowd pleaser that is packed with flavor, using some delectable summer fruit. It starts out as a basic cake, but when you add the blueberries, it becomes a special dessert that everyone will love. The yogurt and sour cream ensure a creamy, moist inside. The lemon adds a little tang that beautifully accents the taste of the blueberries. The poppy seeds are the savory here, adding a little crunch and even more delicious taste. The result is a cake with a custard-like consistency that is topped off with delightful, sweet blueberries that make this cake so enjoyable.

This recipe is courtesy of Half-Baked Harvest and will serve 10 people who will leave your barbeque full and happy. 

Ingredients for Blueberry Lemon Poppy Seed Custard Cake:

For the dressing:

1/2 cup, plus 2 tablespoons granulated sugar
1 stick (8 tablespoons) salted butter, at room temperature
1 tablespoon lemon zest, use Meyer if you can
1 large egg, at room temperature
1 tablespoon, plus 2 teaspoons vanilla extract
1 1/2 cups all-purpose flour
2 tablespoons poppy seeds
1/2 teaspoon baking soda
1/4 teaspoon kosher salt
1/2 cup sour cream or plain Greek yogurt
1 1/2 cups heavy cream
4 large egg yolks

For the Blueberries:

2 cups fresh or frozen blueberries thawed and drained
1 teaspoon granulated sugar
1 teaspoon all-purpose flour
Powdered sugar for dusting

Preheat the oven to 350° F. Line a 9 or 10-inch springform pan with parchment paper, butter the parchment paper.

Make the cake:

In a large mixing bowl, beat together the butter, 1/2 cup sugar, and lemon zest until light and fluffy, about 2 minutes.

Beat in the egg and 1 tablespoon vanilla until combined.


Add the flour, poppyseeds, baking soda, and salt, and beat to combine.

Beat in the sour cream until just combined.

Spread the batter over the bottom and 1 1/4 inch up sides of the prepared pan, creating a boat for the custard.

Making sure batter on sides is 1/4 inch thick and you have an even layer of batter on the bottom (see above photos).

Make the custard:

Whisk together the egg yolks and 2 tablespoons sugar in a medium bowl until combined.

Place the cream over medium heat and gently warm until steaming.

Remove from the heat and stir in the vanilla.

In a slow stream, whisk about 1/2 cup of the cream into the egg yolks, whisking constantly so they don’t scramble.

Whisk in the remaining cream.

In a bowl, combine the blueberries, sugar, and flour.

Sprinkle 1 1/2 cups of berries over the custard.

It’s going to be jiggly.

Bake for 25 minutes.

Remove from the oven and gently pour over the remaining custard, then sprinkle on the remaining berries.

Bake another 20 – 25 minutes until the sides of the cake are deep golden.

The custard should be pretty jiggly in the center.

If you want a looser custard, bake a total of 45-48 minutes.

Let cool, then release the cake from the mold.

Refrigerate 1-2 hours or until ready to serve. The colder your cake is, the more set your custard will be.

When ready to eat, generously dust the top of the cake with powdered sugar and enjoy!!

Pour 3/4 of custard into the center of the cake, reserving the remaining 1/3 cup.

It’s that simple!


signature

[recaptcha]


In the summer, I love to find local antique stores and take my time browsing. I enjoy going through beautiful old items that may seem past their prime for some. Old things have sentimental value, even for those like myself, who don’t like clutter. I’m always going through the things I have and discarding so many of them just to make room for the new (or old?) things. 

Of course, I’ve updated some really well-loved possessions with a new and updated version. But still, there is a certain mystique to old objects. Where did it come from? Who had used it before me? I like the feeling of making old things new again. I relish sifting through all the items in a store, looking for a piece of buried treasure. You can go in there, not expecting to find anything, yet maybe there is something valuable to be found. 

Collectables and vintage items connect you to a bygone era. I am guessing that many of the young adults today would not recognize many of the items in an antique store, though for us older people, it can be a trip down memory lane. Often, I come across items I remember having as a kid. I have seen a table and chairs so similar to the ones I grew up with, sending me right back to my family’s kitchen. Old pots and pans that my mother had are now considered collectibles now. It’s really fun to see items that could have been yours (or your parents’) that you had forgotten about long ago.

Antique furniture, lamps, and clocks often have a ruggedness that can’t be found in modern-day items. Let’s face it, so many things that are made now don’t last very long. Yet most of the things that were made many moons ago last forever. Antiques can give a nostalgic and romantic ambiance to your home, making them excellent for redecorating spaces. Vintage pieces can be adaptable to the latest trends, so even if you prefer a more modern aesthetic, you can enjoy antiquing as well. So take a walk to your nearest antique store and see what happens. You might find your next new piece!

Onto the recipe. I love shrimp scampi, I think I’ve perfected my recipe through the years. I figured I could switch it up and make chicken scampi, something I knew my family would love as much as my original recipe. The chicken browns up to golden brown, delicious caramelization. The garlic and red pepper flakes are just the right amount of heat to bring to a family table. The wine, parsley and oregano are savory goodness, and the butter gives this dish creamy deliciousness. It is then topped off with Parmesan cheese, making this dish one you will want to make over and over.

This recipe is my own and makes 6 hearty servings for you and your family.

Ingredients for Chicken Scampi Pasta:

Kosher salt
1 pound thinly-sliced chicken cutlets, cut into 1/2-inch-thick strips 
3 tablespoons olive oil 
8 tablespoons unsalted butter, cubed 
6 cloves garlic, sliced 
A pinch of crushed red pepper flakes 
1/2 cup dry white wine 
1/2 cup chopped fresh thyme 
1/4 cup chopped fresh oregano
12 ounces angel hair pasta 
The juice and zest of 1 lemon 
1/2 cup freshly grated Parmesan  (plus more to taste)

Bring a large pot of salted water to a boil for the pasta.

Sprinkle the chicken with some salt.

Heat a large skillet over medium-high heat until hot, then add the oil.

Working in batches, brown the chicken until golden but not cooked through.

Remove the chicken to a plate.

Melt 4 tablespoons of the butter in the skillet.

Add the garlic and red pepper flakes and cook until the garlic just begins to turn golden at the edges, 30 seconds to 1 minute.

Add the wine, bring to a simmer and cook until reduced by half, about 2 minutes.

Remove from the heat.

Meanwhile, cook the pasta until very al dente, reserving 1 cup of the pasta water.

Add the pasta and 3/4 cup pasta water to the skillet along with the chicken, lemon zest and juice and the remaining 4 tablespoons butter, the oregano and the parsley.

Return the skillet to medium-low heat and gently stir the pasta until the butter is melted, adding the remaining 1/4 pasta water if the pasta seems too dry.

Remove the skillet from the heat, sprinkle with the grated cheese and parsley and toss before serving.

It’s that simple!

signature

[recaptcha]


We’ve had such terrible summer weather this year. Memorial Day weekend, rain. July Fourth weekend, more rain. When I have plans to go to my beach house, which is usually on the weekends, I check the weather, and all I see is rain. It is so disheartening to me–and I am sure all of you as well. The rain usually brings on cooler weather, and at the beach it is always ten degrees colder than that.  Yuck! 

I hope by the time you read this, better weather is near and sunny days are upon us.

When you wake up and see the gray sky, it makes you feel gloomy. Everything seems so dark and sad. Outside is wet and soggy, and it just doesn’t make you feel like doing anything. Who wants to walk around in the rain, getting wet? There is shopping to do, I suppose, but how much can you shop? There are games you can play at home, you can go to the movies, go to a museum (if they are open), or go for ice cream (which I seem to be doing much more than I would like). If it is just misty out, you could go for a walk on the beach, but even that is a little bit sad.

I do enjoy days when I can just be at home, watching a movie, a good series on TV, and doing my needlepoint. I started needlepointing when I was a teenager, though I stopped for a while when I had my children (no need to guess why here), and recently picked it up again. I find it very therapeutic. My husband doesn’t understand my obsession with it, but always encourages me on my way and enjoys the finished product. So far, I have completed two large ones with nautical themes that I will frame and put up at my beach house. I have already started my third one, and with all the rain I see in the forecast, I am sure this one will be completed very quickly as well.

Going out to eat is also something we enjoy, whether it is raining or not. The restaurants near my home are excellent, and since my husband and I are foodies, we like to try as many of them as we can. Of course, there is always cooking and writing for my blog, but hey, I need vacation from that too. I miss the sunny days spent on the beach or at my pool. Looking back at my pictures from last year makes me miss those days even more. 

I hope we get some better weather soon so that we can finally have another day at the ocean! We have about 3 months of summer left and I want to enjoy them to the max! I hope you all are experiencing some better days in your state. There is a huge storm in my area right now, and while my plants are very happy, I am not. 

So, if you can’t be at the beach, maybe making this delicious dessert will cheer you up. Clafoutis are a French dessert, made with fruit. The fruit is baked in a buttered dish and covered with a thick flan-like batter. The clafouti is dusted with powdered sugar and served lukewarm, sometimes with whipped cream on top. It is perfect for using up any summer fruit you have leftover, but pears are a great place to start.  The eggs and sugar are blended into a fluffy batter. Then you add the vanilla, lemon zest, and brandy for even more deliciousness. The pears are the star of this dessert, giving it a delectable flavor that makes this dish enticing and beautiful.

The recipe is courtesy of Ina Garten and makes 8 servings of a beautiful dessert that can brighten even the dullest day.

Ingredients for Pear Clafouti:

1 tablespoon unsalted butter, at room temperature
1/3 cup plus 1 tablespoon granulated sugar
3 extra-large eggs, at room temperature
6 tablespoons all-purpose flour
1-1⁄2 cups heavy cream
2 teaspoons pure vanilla extract
1 teaspoon grated lemon zest (2 lemons)
1/4 teaspoon kosher salt
2 tablespoons pear brandy, such as Poire William
2 to 3 firm but ripe Bartlett pears
Confectioners’ sugar

Preheat the oven to 375 degrees.

Butter a 10 x 3 x 1-1⁄2 inch round baking dish and sprinkle the bottom and sides with 1 tablespoon of the granulated sugar.

Beat the eggs and the 1/3 cup of granulated sugar in the bowl of an electric mixer fitted with the paddle attachment on medium-high speed until light and fluffy, about 3 minutes.

On low speed, mix in the flour, cream, vanilla extract, lemon zest, salt, and pear brandy.

Set aside for 10 minutes.

Meanwhile, peel, quarter, core, and slice the pears.

Arrange the slices in a single layer, slightly fanned out, in the baking dish.

Pour the batter over the pears and bake until the top is golden brown and the custard is firm, 35 to 40 minutes.

Serve warm or at room temperature, sprinkled with confectioners’ sugar.

It’s that simple!


signature

[recaptcha]


Recently, a friend of mine who had moved to the city came to visit me. As I greeted her by the door, she asked: “What smells so good?” I told her she was smelling all the grass and flowers growing. She was so surprised. Now that she lives in the city, she doesn’t realize that different seasons come with these subtle changes. 

When I lived in Florida, I came back north around this time of year for a bridal shower. As I was walking to the celebration, I smelled something wonderful and wondered what it could be. Then it dawned on me; like my friend, I was smelling spring! When you live in Florida, there are no seasonal changes, and at that moment, I realized how much I missed them. Fortunately for me, I got the chance to move back to the northeast and I always look forward to the seasons changing.

Spring and summer are inspiring to me because it is a time of renewal. The trees and flowers are blooming, their colors bursting with the richness of the season. The air is sun-kissed and you can feel the warmth of the sun for the first time in so long. The sky becomes the most beautiful shades of blue. The birds come back, caterpillars become butterflies, and the children are playing little league once again. 

I think people are just generally happier in the summertime. Your days ring the promise of leisure and spending quality time with the ones you love. It is the most laid back season, and our worries seem to dissipate with the longer days and warm weather. Meals are lighter and we don’t even mind if we let our kids eat ice cream for dinner! Beach days offer a lovely change of scene, and a chance for families to enjoy time together. Does summer ever have to end? 

I definitely understand not wanting to cook– with so many exciting things, why would you want to?  So here is a tasty one-pot dish, with easy clean up. The spaghetti bakes up to a beautiful cake-like consistency that is light and airy thanks to the eggs. The meat is complemented by the marinara sauce, garlic, and onions. It is then topped with the mozzarella, ricotta and Parmesan cheese, which makes this dish a perfect meal to serve any day of the week. 

This recipe is courtesy of Delish and will make an easy and delicious meal for 6.

Ingredients for Spaghetti Pie:

Cooking spray
8 oz. spaghetti
2 large eggs, beaten
1/2 c. grated Parmesan, divided
1/2 tsp Italian seasoning
2 tbsp. extra-virgin olive oil
1 large onion, chopped
2 garlic cloves, minced
1 lb ground beef
Kosher salt
Freshly ground black pepper
2 c. marinara
1 cup ricotta cheese
1 cup shredded mozzarella
Freshly chopped parsley, for garnish

Preheat oven to 350° and grease an 8” springform pan with cooking spray.

In a large pot of boiling salted water, cook spaghetti for 3 minutes less than package calls for.

Drain. 

In a large bowl, toss spaghetti with eggs, ¼ cup Parmesan, and Italian seasoning.

Transfer to prepared springform pan to form “crust”. 

In a large skillet over medium heat, heat oil.

Cook onions until soft, 5 minutes, then add garlic and cook until fragrant, 1 minute.

Add ground beef, breaking up the meat with a wooden spoon, and cook until no longer pink, 6 minutes.

Season with salt and pepper.

Pour in marinara and heat until warmed through, 5 minutes. 

Spread ricotta over spaghetti .

 Pour in meat sauce.

Top with mozzarella and remaining ¼ cup Parmesan.

Bake until spaghetti is set and cheese is melty, about 30 minutes. 

Let cool 10 minutes before removing from pan, then garnish with parsley before slicing.

It’s that simple!


signature

[recaptcha]